Thursday, February 25
artful thursdays #8.....nut cup easter basket tutorial
spring is on its way i can feel it. the other morning as i left the house at 5am i heard birds for the first time in months. living in utah with a blanket of snow that lasts through the winter the first signs of spring are a cause for celebration.
that and the tiny chenille chicks and easter candy that they just stocked at the market....
today's artful thursdays project is a quick one you can make in 15 minutes once you gather your supplies. you will need some little white party nut cups, pipe cleaners, crepe paper, tiny blossoms and stamens, a chenille chick, and a bit of trim.
step 1. nibble a chocolate easter egg.
ok, real step #1. cut your pipe cleaner to 6 inches and fold into a handle. (try not to get chocolate on the pipe cleaner) glue the two ends (3/4 of an inch) on either side of a paper nut cup and clip until the glue dries.
step # 2. cut a strip of crepe paper 1 inch wide and 36 inches long. gather down the middle with your sewing machine or needle and thread. fold crepe paper ruffle in half along the stitching and glue around the top edge of the nut cup. glue another folded ruffle on top of the first so you have a nice ruffly edge.
step #3. gather a strip of tulle or vintage curtain 1 inch wide and 20 inches long. glue it on top of the crepe paper ruffles.
step #4. glue a strip of pretty 1/4 inch trim along the center of the tulle. this darling spool of trim was at joann's. they had lots of pretty spring colors of narrow vintage looking trim and each spool was only $1.00!
step #5. gather together a tiny posy of millinery flowers and stamens. wire them tightly together and clip off extra wire.
step #6. wrap the posy with ribbon or string and tie to the pipe cleaner handle on one side.
step #7. fill the basket with tiny paper shred. make your own by cutting a folded up piece of crepe paper into 1/8 strips.
step #8.
cut text strip from a book with words you like and fold it in half and notch the end. glue around a paper millinery flower stem and tuck the banner under a little chenille chicks wing. glue in place. the little banner could have a name on it and your basket could be the place card for a friend coming to tea...
fill your basket with little candy eggs and pop your chick on top. its as sweet as you!
here are a few other tiny easter baskets i made. the vintage crocheted nut cup holders came in an old chocolate box. i imagine they were brought out for bridge night with the girls. i dressed this one up a bit...
i made a few easter decorating kits for you with all the supplies to make 8 little easter baskets on a lovely sunny afternoon.
happy thursday, julie
Wednesday, February 24
can't wait till march 1st!
just got the email from my cute friend marilyn that my encaustic wax piece made the cover of somerset apprentice! you can see marilyn's wax collage here. scroll down to see the piece 'No. 5'
we were just messing around with wax at one of our art group nights and had the best time. it is definitely messy, but fun!
i can't wait till march 1st to get my hands on a copy....
**update** postman just delivered my copy only one hour after posting, wow somerset is lighting fast!
Thursday, February 18
artful thursdays #7......post it note mailing labels tutorial
today is actually going to be the ultimate artful thursday for me. i am taking the whole day off! first candice and i are meeting up in salt lake to plan our summer art nest retreat, so excited about that! we will shop at a few of our favorite antique stores, go out to lunch, and then in the evening head to our art group for our monthly meeting making sewn bird collages on book covers. what a great day right...
so my artful thursday tutorial today is all about quick and easy using what is sitting on my desk. i love, love mailing packages (almost as much as getting them). to make them extra special i make my own mailing labels. it is great to have a few on hand when dashing to the post office.
i have quite a few vintage paper scraps on my desk since i have been packaging up the tiny book swap bundles. (i am waiting to post about the swap until everyone gets their packages..) all you need is some paper scraps, scissors, a glue stick and some post it notes or small bird images. i found these sweet bird post it notes at a little gift shop nearby. they are made by cavallini paper and can be found here.
step 1. cut out rectangles of your scrap ledger papers. 4 1/2 X 3 inches is an average size, they can be a bit bigger or smaller to use up your scraps.
step 2. stick the post it note images on your label papers. i like how the ledger paper already has lines to write in. when you like the placement glue them in place.
step 3. print off a page of text that says to: from: i downloaded a free font called 'coffee tin' from 1001 free fonts. they have mac and pc downloads. just be sure to restart your computer to see the font in your font book after you install it. i printed my page using dark brown ink and 24 point text. print off a test sheet on printer paper and then double stick tape the first blank page in an old book to your paper. run the paper through your printer again to get the text on your cool old paper.
step 4. cut out your to and from labels and glue in place. thats it, you are done!
you can make them a bit more fancy if you want by stitching or doodling borders. have fun and make a whole pile of labels as there are 480 post it notes in every tin....
until next time, julie
Sunday, February 14
cupid's arrow
cupid's arrow captured in vintage rhinestones. ..february
today is a day for sweet little bouquets of flowers, for cards on your pillow and kisses.
a day for romance...
i still swoon when Mr. Darcy strides through the mist rising over the moor to see Elizabeth and says "you have bewitched me body and soul." that one nails me every time....
a day for handmade gifts....
i was beyond thrilled when Somerset Life sent me the note my valentine had been selected for the February image in the new Somerset Life 2010 calendar! it is the most gorgeous calendar filled with romantic images to take your breath away.
'the gift of lavender' by kellene giloff ..september
'charmed bottles' by molly quoyeser ..october
'kindness, beauty, truth' by ruth rae ..august
'a wreath of grace' by carlene federer ..january
today is a day for heart shaped boxes of chocolate....
xo julie
Thursday, February 11
vintage velvet heart.....artful thursday #6 tutorial
welcome to artful thursday today. i was so looking forward to just sitting and stitching today since i knew i would be cutting into the vintage silk velvet dress i found for my project. i had to make myself stop sewing just so i could take a few photos.
the day was cloudy with a few snow flurries, i sat and looked out my window and pulled the needle and thread through the velvet as i added each bead and dreamed. after yesterday's craziness that started at 4am and went non-stop even through lunch until 11pm last night i needed a quiet day today.
if you have ever come across a piece of vintage silk velvet you know how luxurious the velvet feels. it feels warm to the hand and incredibly light and supple. i found this beautiful pink velvet dress for just a few dollars at the antique mall. it was hanging on a nasty wire hanger, torn in several places with its covered buttons hanging limply in place. i folded it over my arm and carried it through the store, almost too distracted to keep shopping.
at home in my studio the dress has been waiting for valentines day.....
the heart pattern came from a piece of blue cotton fabric i found outside on the ground, already in the shape of a heart. weird huh.
i thought about maybe using the back of a worn out handstitched quilt to stitch the heart on, but then chose the flowered linen instead.
step 1 cut out the velvet heart
step 2 sew the velvet heart to your background with small running stitches close to the heart edge. leave a one inch opening for stuffing.
step 3 use a wooden chopstick to poke the stuffing in your heart. sew the opening closed.
step 4 sew tiny seed beads around the heart edge.
*tip* keep your tiny beads from rolling all over by placing them on a square of wool felt.
the beads i chose to use came from this vintage beaded bag. it must have been gorgeous when it was first made, lined with silk and adorned with a lovely beaded tassel. the seed beads are cut steel made popular in France around 1830. the cut steel beads were sewn around buckles and on buttons. i love how the beads look nestled into the velvet.
step 5 sew a tiny bunch of buds and leaves to your heart.
here is the spray of millinery flowers i unpicked from a squashed hat and some vintage crocheting thread i use for stitching.
thats how my little heart turned out. i can't decide if i want to use it as the cover of a book, the top of a pincushion, or sewn to some watercolor paper for a lavish card like this one i made last year.
a few more hearts to get you thinking about what you might want to make.
here is the lovely linen heart that came in cheryl's baby book swap package. love, love how she covered the tyvek envelope with red dots and sewed on all the labels.
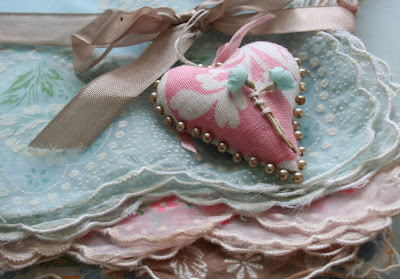
the heart that was in somerset life magazine sewn around with pearls from a broken necklace on a stack of flocked vintage hankies.
my all time favorite sewn heart.
have fun sewing your own little stuffed hearts. until next time, julie
Thursday, February 4
love birds....artful thursday #5 paper collage tutorial
well, it is 11:20pm here in utah and i am just uploading my photos for my post and baking sugar cookies for school tomorrow. (if i finish by midnight it will still be thursday) yup, one of those days. you may have noticed i haven't posted anything since last weeks artful thursday.... yup, one of those weeks.
my love birds project idea came from a sweet little shirt one of my students wore to school last week. i asked her mother if she would send me a scan of the image.
i wanted to make a paper collage with the little love birds on a swing. here is how my afternoon went:
first i googled bird silhouettes and printed off my favorites. i didn't like how the birds on the shirt had their necks tucked weird and how the two love birds were facing away from each other.
here is the sketch i did to make a pattern. i cut out both birds using some pretty french book paper and set them out on my background paper. (kitchen spice rosemary by BoBunny) you never know how collages will grow so i placed the birds in the middle of the paper and drew the swing and text around them.
next i sewed along the swing sketch three times. i like the metallic silver thread by Coats. it is rather fragile for sewing on paper so i always use regular thread in the bobbin. roll the paper up like this to fit in your sewing machine.
then before i glue anything down i always letter the text, just in case i choke.
using my favorite 10/0 royal gold paint brush and some golden's fluid acrylic in titan buff i paint along my pencil lines first. after the paint is for sure dry i carefully erase any left over pencil marks. then i outline the letters using a 005 micron pen.
using a bag of small millinery flowers from my desk i lay out some around the swing. it was then that my son came home from school to report that he had no homework, wanted to hang out, could he not do a job today, and then pointed out three really great ideas to add to my collage.
go figure. he suggested i needed to use the green velvet leaf laying on my desk, some coral crepe paper from the pile, and some tiny plastic stamens from a dish nearby. he was quite pleased with himself and left with no job to do...
with everything glued down the collage felt like it was still floating so i framed it with some wallpaper and crepe paper ruffles.
i have been buying frames at the thrift store to spray paint and use for hanging all the art my kids are doing. this frame was $2 and ended up fitting perfectly. ever notice how a frame really finishes a piece? fair warning, there is one more thursday until valentines day and i am planning to make some silk velvet hearts. then i will move on to something un-heart related.
happy thursday, julie
Subscribe to:
Posts (Atom)