Tuesday, October 28

Snowman, the before and after photos...


This post is a continuation from my last one.  If you are just joining me, last week I found a zip lock bag of the old spun cotton Christmas package ties.  It was an old collection of Santas and snowmen, some had seen better days.
And well yes, it is Halloween this week and I am posting Christmas images.  That's how it goes when you have a shop and create things for the holidays, I am always working several months ahead. 
With that said, these snowmen were so fun to work with, I couldn't resist mixing things up a bit.  Here are the before and after photos~


Don't you love that before face with the one BIG eyebrow? 
First step was to fix the proportion problem.  I took off the cute top hat, metallic bow tie, sequin and nose.  I decided to save the satin wrapped bottom and use it for a bigger snowman.   I glued on the head from a vintage spun cotton snowman onto a tiny striped satin ball that came from a vintage garland {best find ever!}
The proportion is much better.  I loved his funny face so I left it.  Next I glued on the top hat and used a tiny sequin pin to put the sequin back in place.  I added the chenille arms next and tied a bit of tinsel on for a scarf.  Then I glued the bow tie back in place and added a glittered base so he can stand up.
much better!


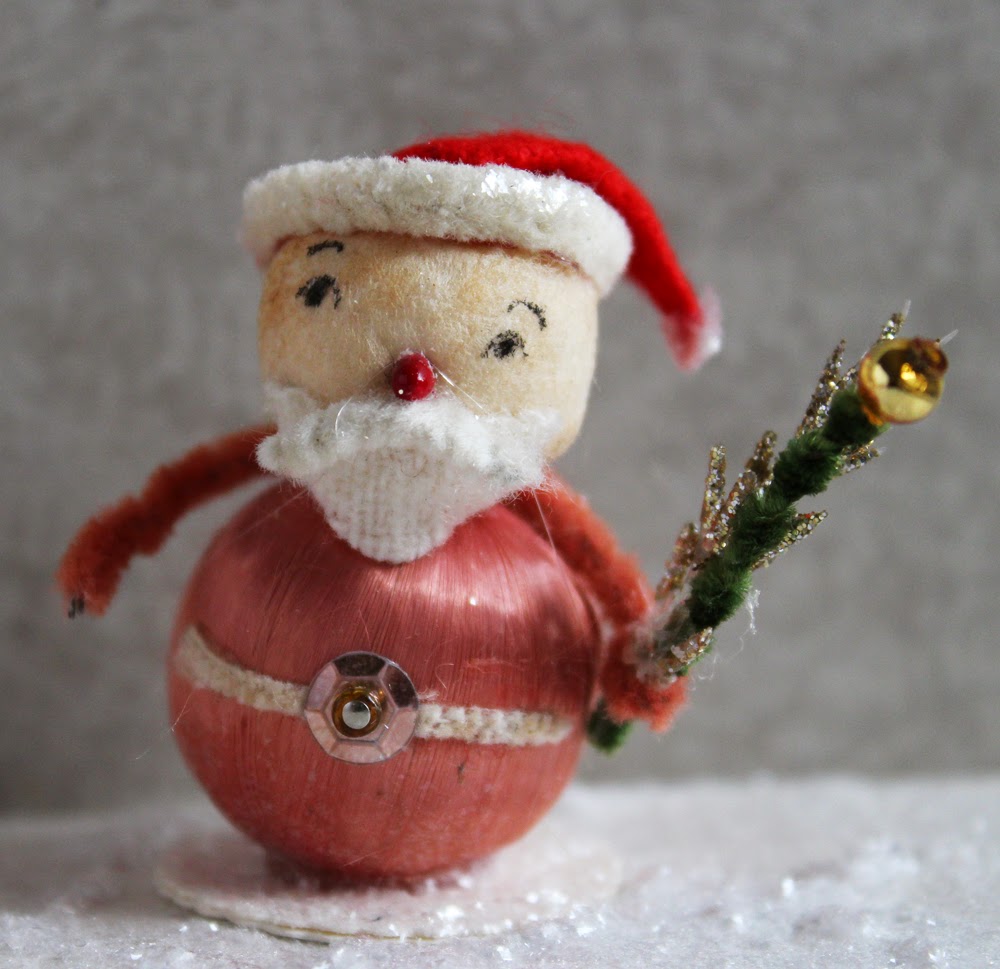
here is where the satin ball ended up~
this snowman has a bit bigger head so it works.  He has a plastic top hat and a wee crepe paper ruffle collar.  I had to trim down one of my ruffles so it would be the right size, its about 3/8 of and inch and folded in half.  The wonderful tree is from an old Christmas corsage.  I wonder if it was that color to begin with or has it just faded after 60 years?


This guy got a vintage mercury ball wrapped in metallic mesh.  So sparkly...


always something so darling about a grumpy snowman...
this guy is not having the best day,  maybe he just hates photo shoots.  his arms are a piece of vintage bump chenille with glass garland beads on the ends.  You can't tell so much by the photograph, but the little guy on the right is only 1-1/2 inches tall.  I just love making things tiny!

I have a few angels to make over and then the elves.  see you soon,
Julie

Monday, October 27

Santa, the before and after shots....


Last week I found a zip lock bag of the old spun cotton Christmas package ties, a collection of santas and snowmen. I had so much fun this weekend making them over adding some fun vintage trims.
Here are a few of my favorites~
the before and after shots are kind of amazing...


First step was to take off the yucky chenille hat trim.  The hat came off next and then the head with the awful face.  I glued on a new spun cotton head and drew on a tiny face and added a berry nose.  The beard and mustache are bits of vintage wool.  Then I glued on the hat with a new chenille trim. 
I added a new belly band and a vintage sequin, pin and bead.  Then some chenille arms holding a vintage bottle brush tree decorated with glass garland beads.  I glued on a glittered base last so Santa could stand up on his own. 
much better!


this santa has a chenille mustache and is holding a glittered branch and a chenille tree.


This santa has a tiny gold medallion on his tummy and is holding the tiniest bell.  I love his tinsel scarf.

Tomorrow I will post the snowmen, time for me to make dinner....

Monday, September 22

Oh my, Mushrooms~


Monday has been Mushroom day at my house~ 
all these mushrooms will be in my Etsy shop Vintage Handmade  tomorrow.
mossy fingers, piles of dyed velvet everywhere, and little forests of mushrooms
all over my desk.   The wine and chocolate set has a beautiful deep aubergine color that is new and a scrumptious chocolate brown...

wine and chocolate

set of 3 large classic red mushrooms

medium mushrooms set of 3 fall colors
this set of 3 fall colors is a medium set of 3 mushrooms.  they are a tiny 2 inches or less


mushroom minis


these are new. mushroom minis only 1-1/4 inches tall with a little hanging loop so you can tie these on packages or hang on a feather tree.  oh so sweet in pink~

pink mushroom minis


aqua large set of 3 mushrooms

acid green set of 4 mushrooms
 I can't help making a couple aqua blue sets everytime since its my favorite color.
the acid green mushroom in this set looks positively yummy.

large mushroom ornament

large mushroom ornament
a couple of large ornaments with hangers for your big tree.

and this photo of them all in a tray after I photographed the groups, wow.
the hand dyed silk velvet has such great texture and just soaks up the color.
I just love making these beauties...


Wednesday, August 6

silk velvet mushrooms~


so this is what i was doing all day yesterday...
making these gorgeous hand dyed silk velvet mushrooms~   ok, i have a whole jar of them now and i can't stop taking them out to feel the silk velvet caps.  i love the colors, how subtle and varied they each are.

each mushroom is completely unique. mushroom stems are wrapped in heavy Italian crepe paper with dried mossy tips. large mushrooms have crepe paper gills under the cap, the smaller mushrooms have full wrapped caps of silk velvet.

i just listed 2 sets in my etsy shop.  i may add an ornament string for hanging, what do you think?


here is the green set.  and a photo of a bunch of different colors and sizes.  i am already getting my holiday booth ready for the Fleattitude show in November.  these mushrooms will be hanging on some mint Christmas trees i ordered this week. 


Tuesday, June 10

art auction for lorraine....


I am so excited to post this sweet kitty as part of the art auction for my dear friend Lorraine Lewis.  She was diagnosed with cancer a few weeks ago and my heart has not been the same since.....
I first met Lorraine several years ago when she came to one of our Art Nest retreats and then shortly after that she and her darling girls joined our Art Group.   She has such a beautiful, kind heart, I am just thrilled to make something for her auction.


The auction will be this Saturday on Instagram.  Search @heart_and_hand to see the lovely things you can bid on.  Also search #artauctionforlorraine to see all the posts.

If you are local there is a wonderful night planned for Lorraine here Anything for a Friend  this Friday night. Date: June 13th 2014     Time: 6 pm--9pm
Activities:
  • Cover band--FLASHBACK 
  • Picnic in the park--BELLA'S FRESH MEXICAN GRILL
  • Kid's Art Center
  • Headliner Concert--SARAH SAMPLE
  • Live Auction
  • Bake Sale
  • Balloon Launch

Location: Ed Kenley Amphitheater ,  405 N. Wasatch Drive   Layton, Utah  84041


Written by Brookey Smith, Lorraine’s daughter, “Anyone who knows my mom, Lorraine Lewis, can’t say enough about what an angel she is.  She is beautiful, kind, loving, giving, and selfless.  Our friend Stephanie Lee said, “One thing I know for sure is that the light your mom is in this world is such an indescribable blessing for so many of us.”  In this last whirlwind of a month in finding out about her cancer and how aggressive it is, this is how I have come to see her, a pillar of light.  She radiates hope and joy.  She believes in miracles and because of the blessing she is in other’s lives we know we will see them.”


kitty is 12 inches tall and made with vintage fabrics, glass buttons, and tiny velvet millinery flowers. The tiny pink velvet ears and aqua eyes are dyed silk velvet.  The little sheer flocked cheeks were cut from a tattered sheer prom dress :)  and the pink polka dot nose is from a vintage Minnie Mouse costume!  Her face is cut from a vintage linen dresser scarf and her skirt is made from a vintage ric rac apron, perfect for Lorraine as she is such a great cook, I have enjoyed so many of her fabulous recipes!

I chose to make a kitty as Lorraine sewed and painted over 24 kitties for our Art Group to decorate one  Halloween  Here is Lorraine at our Witches Night Out Art Group in her winning cat costume with an armful of kitties decorated by everyone~


Thank you for sending your love to Lorraine, See you at the auction,
xo  Julie

Sunday, March 9

Paper Mache Sunday...


 we are making paper mache figures next week for art group and i just couldn't wait.  my daughter and i started making figures and wall plaques right after i got home from art group last month.  courtney showed me a magazine article by Sarah Hand in an old issue of Somerset.  we stayed up until 2 am making paste and glopping paper mache all over the counter.  today the weather was just perfect, we opened the doors and spread out our paints...
i wanted to take a few work in progress photos~


i used a small hand sanitizer bottle from the dollar store.  this is the figure after making a tinfoil head, wire ears, and rolled foil arms.  i covered everything with masking tape.

after the paper mache strips and still wet!  i put it in a warm over overnight to dry.  {turn oven on warm hold for a few minutes, then turn it OFF}  use a cookie sheet with a cookie rack inside to lay your figure on.
the large wall plaques i just put in the oven on one of the racks.


next day all dry....
add some gesso and let dry again....   lots of steps here, it is more fun to make several at a time so you can use your paste and then gesso everything together.


more fun than i thought it would be, i just pencil sketched right on the gesso to get an idea of what i wanted her to look like.  i was a bit worried about a few places where the paper strips had dried with gaps.  it was easy to sand them down a bit with a nail file, the coarse ones you can get at the beauty supply store for fake acrylic nails.


 close-up of the face.  after painting i used a pencil to add details


here is a wall plaque with gesso.  i started with a cardboard cut out.


pencil sketched design.  oops, forgot a photo of the finished plaque.  this one is about 2 feet tall.

it was fun experimenting, learned a lot and now i feel more confident moving forward with some new pieces.  it was easy for the kids to dive right in with me.  who doens't love making a mess with paper mache?  my daughter made Finn from Adventure Time.  Now the kids want to make Totoro....
time to make another batch of paste :)
Julie

Saturday, March 8

Spring SALE~ 4 mercury glass birds 20% Off


4  lovely birds made out of glass with a beautiful mercury glass patina. each bird measures 3 inches long and has a metallic chenille tail. Spring Sale 20% off the collection of all 4 pretty birds in my shop.

I love the pretty wire bird cages decorated with bottle brush trees and these birds. here are a few I have made~


this is the first one I made using vintage French silk ribbon, tulle, and tiny millinery flowers.


pale green decorated bird cage 20% off here~


make your own lovely spring centerpiece with the weathered wire bird cages also 20% off~
the arch style here~

 and the darling house style weathered wire bird cage here~
the little doors open and close and the little hearts are so sweet....


happy spring wishes,
Julie


Saturday, February 1

pretty new colors spring collection tinsel trim...

I had this lovely tinsel trim custom made for me in these 5 gorgeous colors and couldn't wait to share a photo with you all.
brand new in the shop and on sale this week 20% off the spring collection of all 5 colors.

I tied this mercury glass candle with a piece of the pale pink tinsel so you can get an idea of how lovely the drape is. such pretty Easter colors don't you think...


Monday, January 6

An Artsy Weekend {Fabric Arts}


 I just couldn't be a bit more excited to announce I will be teaching at my friend Marci Welcker's An Artsy Weekend this March.  Here are all the details and you can head over to her blog Fallow Field Farm to sign up and for more information~

An Artsy Weekend {Fabric Arts}

Welcome to an Artsy Weekend {Fabric Arts}.
It will be a weekend full of learning from two of the
best in the art of fabric.
They both bring something uniquely their own.
You may recognize this lady...she's a staple in Sew Somerset and in 
fact the apron we will be making is on the cover!
She will be teaching fabric dyeing and how to make resin jewelry as well.
I am just thrilled to learn from her.
Here's a little about Ruth...
Ruth Rae enjoys combining her deep love of treasures from the past
with cutting edge trends of today.  Ruth is known for her soulful jewelry creations
that are tales on their own as well as her mixed media fabric work that combines 
altered textiles, words, and found objects.  Her artwork is recognized
for its time worn appearance that she achieves by creating layers of new
and old.  It leaves you feeling as though you are taking in a creation from long ago.

Ruth's pieces have graced the covers and pages of many books and art 
publications as well as DVD's and television.  She aspires to motivate
and inspire others to follow their dreams through her artwork,
teaching and books.  
Ruth Rae Etsy Shop


                                   **************************************************************************
 
Our next teacher is someone I am proud to call 
my friend.  
She amazes me with her endless 
stream of creativity.


Julie Collings lives at the base of the beautiful Rocky Mountains
with her husband and four children.  Her house is filled with art projects,
                                      bicycles, cooking experiments and guitars.  Julie loves growing
English roses, cooking with real butter, listening to loud music, shopping for

vintage treasures, curling up with a book late into the night and making
                                     pretty things.  

 To see more of her art visit her blog~
and her etsy shop~
Vintage Handmade

Julie is known for her felt creations and the beautiful things
she can do with vintage elements.
She will be teaching a sweet little Vintage Bunny.


Here is a description of her class...
These little vintage bunnies are as fun to make as they
are to tuck in an Easter basket.  Welcome Spring with us
as we make our own collection of sweet stuffed bunnies.
The bunnies are made with vintage floral fabrics and a 
collection of ruffles and vintage millinery trims.
Each one has soft fuzzy ears and a tiny basket filled with
flowers or a darling chenille chick.
This half day class comes with your own kit that includes
everything you will need to make one 9-inch bunny and enough
material to get you started on a wee baby bunny if you like.


**************************************************************************

{Marci Welcker}
(yes, me)

I have been collecting vintage train cases for a year
just for this class.
You will each be given a train case as well as all of 
the goodies needed to make it your own.  
We will be repurposing them into a special little 
sewing kit.
Pictures will come soon.

**************************************************************************
Retreat Schedule
(I am a go with the flow retreat host so this isn't 
set in stone, just a good guide to go by.)

Thursday, March 13th:

Check-In at 9:00
Class time 9:30~12:30
Lunch 12:30~1:30
Class time 1:30~5
Dinner

Friday, March 14th:

Breakfast at 9:00
Class time 9:30~12:30
Lunch 12:30~1:30 
Class time 1:30~5
Dinner

Saturday, March 15th:

Breakfast at 9:00
Class time 9:30~12:30
Lunch 12:30~1:30
 Class time 1:30~5
Dinner

You are welcome each night to stay as long as you'd like
working on projects or just visiting.

**************************************************************************

Retreat fee $600

Retreat fee includes:
Art Workshops
Kits for Workshops
meals and snacks
late night gathering & creating time
sweet little gifts

Please contact me at fallowfieldfarm@hotmail.com to
set up payment arrangements.
I am so so excited for this retreat.
The talent that both of these ladies bring with them is a little
overwhelming and being able to learn from them will be such a treat.
I would love to have you join us!
I will send you a confirmation email upon registering.

The blah blah blah stuff...
I require a $150 deposit to hold your spot.
I am more than happy to make payment arrangements with you.
You can contact me at fallowfieldfarm@hotmail.com. 
Your registration fee is non-refundable after January 15th, 
you can transfer it until March 1.
Both teachers have requested that I have at least 20 students.
Because of this, if I do not have 20 students signed up
by March 10 I will refund your tuition in full.

There is a nice hotel nearby that I will recommend to you upon registration.
The nearest airport is SLC International.


Related Posts Plugin for WordPress, Blogger...