Saturday, October 30

artful thursdays #26....halloween cat tutorial and adopt dolores...


this week we had our art group witches night out halloween party at candice's house. i got home at 2:30am so it is a good thing there wasn't any school the next day! the food was spectacular, my favorite was the spiced sweet potatoes that candice had made with roasted sweet potatoes with melted butter and milk steeped in mulling spices. with a bit of fresh ground black pepper it was divine...
here are a few of the costumes. cheryl in her vintage black dress


em and amanda


lorraine and her winning cats costume


me and candice


can't believe i didn't get a photo of everyone! here are all the girls last year at our witches night out.


our halloween cat project turned out so fun. lorraine sewed together all the cats and stuffed and painted them ahead of time so we had all the fun of decorating them. here is the whole basket of little kitties just waiting for the party to start.

lorraine gave me an extra cat to decorate and give away on my blog so here is dolores, she needs a new home. i have never had a give away before so how fun is that?? i will draw a name from the comments and then send her off to you...
we all finished our cats and lined them up for a photo shoot. so cute, right.


my artful thursday tutorial will start with the sewn cat so see this post for ideas how to draw, sew, and stuff one of your own design.
lorraine bought this darling cat from olive rose at art unravelled a while back and used the basic outline for her inspiration.


the cats are sewn out of muslin and painted with black milk paint.
we started out with a cat looking like this:


the one on the left has the seam up the back. i have always hidden the seam down the side, so this is fun and new for me.
step 1. cut out the felt pieces for the face. i used some cute vintage flower sequins on top of the felt eyes because i couldn't find any black buttons the right size.


step 2. sew on the face. i have this pretty thread set from valdani that i bought at the quilt market. the colors are overdyed and varigated autumn hues.


step 3. make a little bow bundle using a piece of gold tulle, a piece of polka dot black tulle, an orange felt flower, and a bit of tinsel. sew the bundle next to the cats ear.


step 4. tie a crepe paper ruffle around the neck. i used a piece of 1 3/4 inch ruffle wrapped around the neck twice and tied with some striped string. fold the ruffle in half over the string and smunch it and squish it down so it lays down flat like a collar.


step 5. make a wee skirt. i gathered a 17 X 6 rectangle of gold tulle folded in half and a 17 X 3 inch rectangle of brown and aqua cotton for the base of the skirt and tacked each layer to the cat with thread. then tied a bit of ribbon over the skirt. it looked too bland so i added a bit of loopy orange trim and an aqua wool medallion with a tinsel center.


step 6. now for some little mary jane shoes. these are just painted on with some acrylic paint and a fine brush.


i love how some of the gals in my art group painted the clothes and faces on the cat body. with the painted muslin the cat is a great canvas. here are a few more group shots of the cats.


just leave a comment if you would like dolores to come live with you. i'll pick a winner and let you know.
well now, hubby just came home with 14 pounds of trick or treat candy...
spooky halloween wishes, julie

Thursday, October 7

artful thursdays #25....halloween witch tutorial


we met for our art group last week and i taught everyone how to make these halloween witches. their bodies are made with wool or cotton wrapped pipe cleaners. i thought you might like to make one of your own, so today's artful thursday project will walk you through the steps to make a wool wrapped doll for you to decorate for any holiday.

the basic supplies you will need to make the doll are wool roving, cotton pipe cleaners, and a paper face. for decorating you might gather bits from your little art shop: crepe paper, vintage book paper, tinsel, stamens, lace, stars, felt, anything sparkly, and some tiny trinkets.


step 1. fold two 6 inch cotton pipe cleaners in half and shape into a body by twisting the two pipe cleaners as shown. my pipe cleaners are the ones really used to clean pipes made by dill's.

step 2. start wrapping your wool roving on the figure in this order: arms, legs, then the body. start at the end of the hand or foot and wind your way into the body with thin wisps of wool pulled off your roving. never cut the wool fibers as they won't wrap back and catch on themselves as well. you can get some great wool roving at ornamentea.

step 3. wrap wool roving around the head to finish the figure and tuck the ends around the neck. use a bit of spray sealer to hold the wool in place if you need to or i like just a bit of tacky glue smeared on my fingers to tuck in any stray bits.


step 4. start designing the clothing. i made a little crepe paper skirt and glued it in place.

step 5. glue on little sleeves. i used some vintage loopy trim tucked over each arm.

step 6. glue on a bodice. i used a piece of halloween garland from last year. the tiny stamens are just glued in place with a black bit of seam binding tied around the middle for a sash. the sparkly tinsel is glued on top.


step 7. make a little witch hat. cut out a cone shape and glue the ends together. i decorated this one with a bit of ribbon trim and a glittered star. the black paper is vintage photo album paper. add a circle base to the hat if you like. glue on your paper face for your doll and then the hat. any old photo copied onto paper will do well. my face is about 3/4 inch tall.

here are the spooky girls made by some of the gals in my art group. i usually don't bother to take photos as the building we meet in has horrible overhead lights and a bad background. this time i just went for it. it was totally fun using just the stuff on the table to set up the photo. thank you my art friends for such a lovely evening!
this one is by Diana and photographed on her gorgeous carpet handbag.


with roller skates and a lovely porcelain head, this little witch is by cheryl.


this sparkly baby with all the ruffles is by candice


lori made this darling doll using a vintage jello mold!


amandas happy girl holds the cutest mask...


heidi was making a doll for each of her kids in their favorite costume. luke skywalker was going to be next, awesome right.


this cutie by lorraine looks like she just won the trick or treat pageant


amazing how each one is so different even though we started out with the same kit. this little pumpkin fairy i made for my pretty little felts book. her pumpkin is a wool bead with a bit of embroidery. hope you enjoy this project. spooky wishes, julie

Thursday, September 30

artful thursdays #24....easy no-sew embroidered button tutorial


i am so excited to get back to my artful thursday projects. today my tutorial is how to make super easy no-sew embroidered buttons.

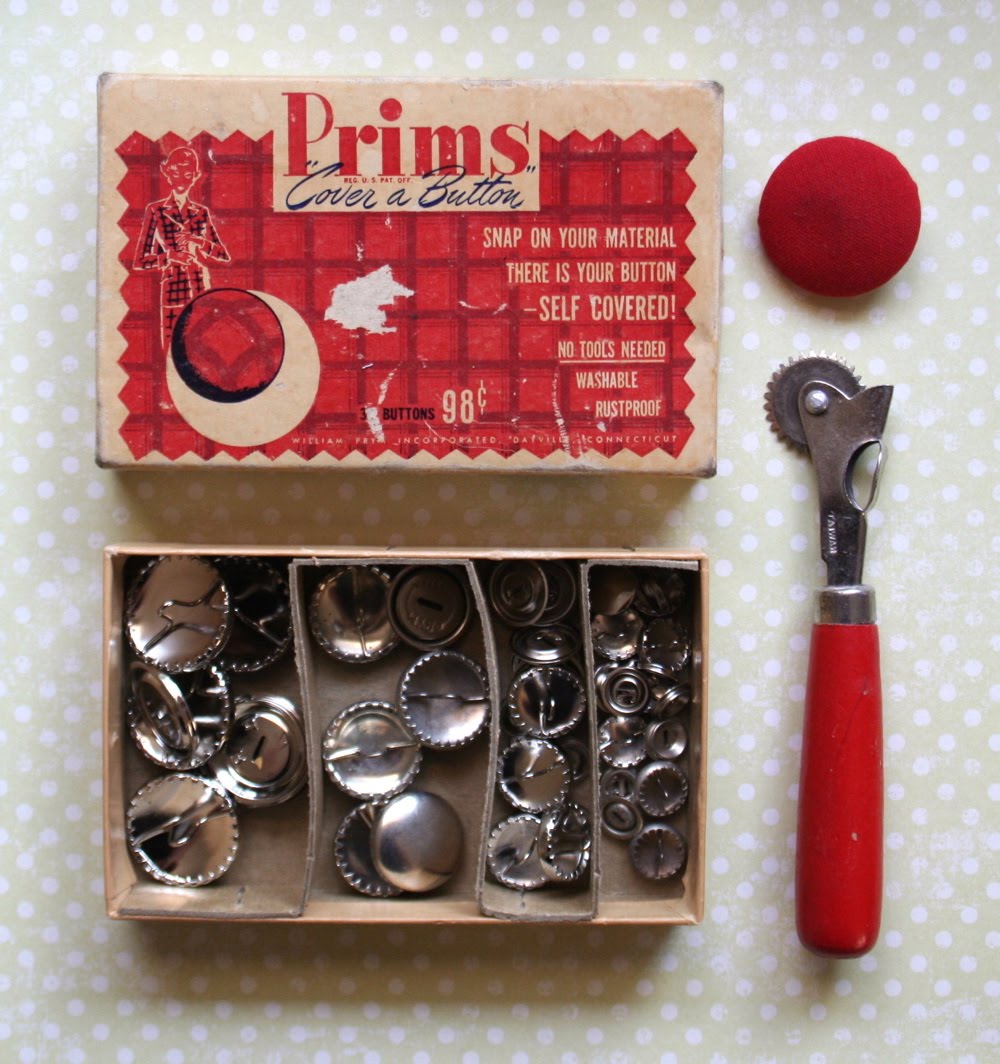
as i was digging through the vintage sewing supplies at one of my regular antique store stops i found this prims, cover a button kit. inside there are four sizes of buttons to cover. apparently they are washable and rustproof. splendid.
it is so easy you don't even need a tool. and just in case you didn't find a little cover a button kit do not fret, i found a similar button kit at joanns.
i like the buttons with the little teeth on the back.


it all started with an old embroidered pillow case. i had cut off the hand crocheted trim to use and couldn't quite discard the little embroidered daisies, so i made a little covered button and liked it so much.


i started looking through my old linens for bits of embroidery i could use.
there it was, the perfect little hankie. stained and torn but with lovely bullion roses and chrysanthemums hand embroidered to the thin cotton.


step 1. wrap your embroidered fabric over the button form to position your design.


step 2. cut out a circle of scrap fabric to test the size then lay your scrap pattern over your embroidery. position, pin, and cut out. my hankie was so thin i used a circle of plain cotton to back the embroidery so the silver button wouldn't show through.


step 3. tuck the circle ends all around the back of the button pulling the fabric taught and positioning your design so you like it.


step 4. place the back over the loop shank and press until the button snaps closed. after the backing is in place you can't take it off and reposition so make sure your edges are smooth and you like how the stitching is centered.

i will never know who stitched this gorgeous piece of embroidery, but i love that i found a way to use it a little bit longer...

happy thursday, julie

Friday, September 17

a love story...


yes, well you might ask where i have been these last couple of weeks. last month my oldest daughter announced she would be getting married in 3 weeks. the wedding was planned for april (they have been dating for 4 years!) but the two of them decided they wanted to be married before he swore in to the marines in 21 days. i went into shock at the announcement. actually it can be done, pulling off a wedding in 3 weeks... but i don't recommend it...

i love this photo of the two of them, it does tell a love story doesn't it. they are blissfully happy together now and they thought the wedding was perfect. it rained on the lovely garden reception. drops puddled around the frosting on the wedding cake and the tablecloths were damp. still the couple was glowing. at one point in the evening i saw him twirling her around with her dress billowing. i just caught a glimpse of their faces, they were laughing as the warm summer rain fell on them. how else do you start a life together?

its just that she was ready to go, and i wasn't quite ready to let her...


my sister katherine had her camera and was taking photos, i just love this one of the gorgeous green ruffled shoes and the bride bouquet. a mix of long stemmed roses and english roses from her grandmothers flower garden wrapped in long strands of silk ribbon.


i ordered these gorgeous sugar hydrangeas from sweet petal bakery. 100 sherbet colored flowers and pale mint colored leaves were dusted with edible shimmer and arranged on a the buttercream frosting cake. they were gorgeous and the cake was delicious. a little summer rain never hurt a good cake....


these are a couple more photos we used to plan the decorations and flowers. this photo was from a site all about flowers...


this photo was on etsy, can't find it now. it was from a seller that had baskets full of vintage tablecloths i guess.


flickr always has gorgeous color collections!


we didn't have time to order fancy invitations so we bought two boxes of these pretty printed blank cards from paper pigeon and set up the text on the computer and had them printed at our copy shop. the paper store had precut photo tissues to put on top of the photo and we added a little insert in a glassine envelope and tied the bundle together with vintage string.


so now it is back to our regularly scheduled life. there is now one less plate at the dinner table and one empty room downstairs.

yet in the way life continues to surprise and delight me, where before we had one now there are two.
julie

Tuesday, August 3

super sale today.....


...............$...$ SUPER SALE $...$..................

i am headed back to school in 3 weeks so i am clearing out
my etsy shop today, august 3rd.

everything marked 20%-40% off. all handmade items, vintage paper goods,
crepe paper ruffles, felt zipper purses, and stamens.

***i will be listing and adding items all day tuesday, SUPER SALE DAY,
as i photograph and package things up***

have fun, julie


Related Posts Plugin for WordPress, Blogger...