Monday, September 3

early halloween treats....

black cat canfolk by Kristen Sunby


labor day means the evenings are getting cooler, the leaves are changing colors on my mountain, and halloween is coming.....  have you noticed the halloween candy is already stocked on the shelves in the market.  its too early to get started on peanut butter pumpkins so instead i unpacked a few of my favorite halloween decorations for the studio.  this black cat canfolk by Kristen Sunby has the most adorable face.  i just ordered it this weekend and it hasn't arrived yet but i know just where to put it.  

sour pumpkin bucket by cat and fiddle
 This sour pumpkin bucket is from last year and was a special order created by C.F. Copp-Waterfield of Cat & Fiddle  such wonderful, creepy halloween creations.

owls by vintage by crystal

 this spun cotton owl collection is new from VintagebyCrystal.  i bought the top left pumpkin owl for my halloween display.  what a great face don't you think.

vintage cake frills by Miss Cecilia


 I found these vintage cake frills made by in England by Deeko at Miss Cecelia's etsy shop.  they are even more gorgeous up close than in the photo.  can't wait to use them in some halloween projects.

vintage number circles
mustachio the black cat candy bucket
jet black twisted wire stamen sprays

new orange and black polka dot tulle ruffles

halloween vintage art kit
and here are a few goodies in my shop Vintage Handmade to get you thinking about halloween....today i got out my supplies to sew up a few more little black cats this week, i can't wait!
enjoy the holiday today,  julie


Friday, August 24

Back to School Decorating and the vintage crisis hotline....


so i bought an orange chair.
a vintage orange chair.
a vintage orange grandma chair.
it even has a matching ottoman.

i may have fallen in your esteem at this point. who would buy an orange chair you might have asked yourself...especially THAT orange chair?

~i have considered blaming my purchase on the recent move of my daughter to college and the shopping trips we spent buying things for her first dorm room.
~it may also have something to do with this year is the first in 15 years i am not going back to school as a teacher, not decorating my classroom, not waiting at the door on that first day to welcome all the kids to share the wonder of the world with me.
~perhaps it is just because the darn thing is so comfy and that carries some decorating weight with me...

anyway, here it is~


my husband drove me to pick it up. it must be true love because he loaded it in the truck and drove me home, and carried it downstairs for me. as it sat there down the hall from my studio and i kept glancing at it.
i admit i had a moment when i needed to call the vintage crisis hotline.  is there one? someone you can call and say, did i just make a big mistake buying that piece of junk?
maybe the volunteer that answers the phone could have said in a nice voice, lady its ok.  it was only 40 bucks right? you can always donate it back to the thrift store if you hate it.  :)

my daughters love it, tiny wants it in her room...
the boy said 'hideous' at first glance and ran up stairs for a snack.
then later in the evening i caught him sitting in it and he admitted 'its growing on me'


i assured them all i had a plan. i showed them this pillow from pillows4fun on etsy.
this is the color scheme i said. you'll like it.


then i showed them this photo and said, see orange chairs can be cool.
i want the family room to be a funky retro hang for the teenagers and their friends.
i hope their friends are not all scared of the orange chair~


it will go perfect with my black world globe collection. this one is at $102.50 on ebay right now. who knew..
it will go with my vintage suitcases. this photo is from beephotography


i am also going to hang both my daughters portrait oils on one wall in ornate black frames... should be wild.
i already have a turquoise Formica game table.


add our vintage Nintendo 64 game system we have been collecting off ebay and this little orange mini fridge. who could say no?


well, here's to saying yes. its never too late to start choosing things that make you happy, creating a space that feels like you, and following a little different path.
even if that path happens to lead to an orange chair.

all the best,
julie

Tuesday, August 7

summer art kits on sale today...

all pink vintage summer art kit
8 pretty summer art kits are on sale today in my shop Vintage Handmade.  the hard part will be deciding which one to buy....  or maybe waiting for your package to arrive in the mail. 
enjoy~  julie


olive and gold vintage art kit
aqua blue vintage art kit
silver and cream vintage art kit
pink lemonade summer art kit


may day art kit

summer sun dress art kit
cameo pink and platinum art kit


Wednesday, July 25

french bistro labels tutorial

i adore sweet little packages~  a tissue paper bundle, a fabric envelope, or even a brown paper sack with a handmade label.  these French Bistro labels are my favorite thing right now for a quick and darling little gift tag.

here are 7 ideas to decorate your labels that will celebrate the holidays all year long.  after the labels have been decorated you can attach them to your parcels and packages with a glue dot or glue stick.


1. love you valentines day label.
punch 2 hearts from vintage music paper and glue the first one to the label, fold the second in half and glue just along the fold. type or print out the words Love You and cut out and glue on label.  thread a pretty string on a needle and poke it through the top of the heart and back up through the label.  tie on a tiny heart charm.

2. sweet birthday candle
trim the bottom 1/4 inch off a birthday candle with scissors.  layer a birthday candle, bit of tinsel, and a paper flower on the label and tie with tinsel string in a knot.


 3. spun cotton snowman
remove the chenille stem and chenille scarf from the spun cotton snowman and cut him carefully in half using an exacto blade.  cut the back of the paper hat off with scissors.  twist back on the chenille scarf and glue your snowman down to a label.

4. holiday holly berries
tie a bundle of sugared millinery stamens and a lacquered holly leaf on a label with a narrow silk ribbon.

5. summer sequin flowers
arrange 3 tiny daisy appliques in a row across a label. using the seed beads and sequins from your collection or a vintage sequined fruit, sew with a needle and thread through the daisy then the sequin then the bead and back down through the sequin to the back of the tag.  tie off your thread on the back after the last sequin flower.

6. pastel Easter bouquet
clip a little bouquet of forget-me-nots from an Easter hat or posy and tie with a pink silk ribbon to your label.

7. spooky Halloween spider
glue a black glittered die cut halloween spider to a label and type or print out the word Boo! and glue to the top of the spider. 

you can order a set of these french bistro labels in my shop~ Vintage Handmade


happy packaging,
Julie

Monday, July 23

princess and the pea...


i am cutting some some of my favorite hand dyed and vintage wool felt today for a friend and sat my newest little birdie on top of the pretty stack.  she looks like the princess and the pea with all her mattresses doesn't she....

 a beauty shot~
princess is made using the same pattern as the wedding cake birdies, just using a heavy satin fabric for the body instead of wool. the fabric is actually a vintage coat lining, i just loved the taupe color and the heavy feel of the satin.  nothing goes to waste when i take apart an old skirt or jacket.  i use the linings to sew ruffles and even use the buttons and old metal zipper!   i sewed the pieces right sides together and then turned them right side out to stuff.  tiny bits of wool were cut for the wings and beak.  i added a little ornament string so she can hang or sit in her nest.


happy monday.  julie


Thursday, July 12

wedding cake birdies....


today i am working on some little felt birds to go on the top layer of a wedding cake.  my darling friend Renas daughter is getting married next week and they wanted some little wool birds with heart shaped wire feet to sit on the frosting of their top layer.


my first pattern ended up looking like a short, fat birdie with a weird tail....  horrifying!
it is always hard for me to anticipate what a sketch will look like after it is sewn and stuffed.


i slimmed the tummy and tail down, added longer legs and the second one came out much better (thank goodness...)

both birds are handsewn with a tiny blanket stitch and have embroidered eyes. i used a fine even wool felt for both birds.   the 100% wool felt from the magic cabin is perfect for this project. the wings were cut with scalloped scissors and sewn in place so you could position them a bit. i like the bride to look a little flittery.   the bride has a tiny flower applique and a vintage beaded sequin pin, while the groom is wearing a black bow tie.


they are packaged up and on their way.  i think i will use this same pattern for some wool bird ornaments this holiday season.....


you may now kiss the birdie~  happy thursday,. Julie

Wednesday, July 4

Celebrate 4th of July Sale....


Happy 4th of July all, its time to Celebrate!  Everything in my shop is 10% off today.  Just enter the coupon code JULY4THSALE at checkout and receive the discount on everything you purchase today.

I am feeling especially happy today as my sisters house was spared from the fires last night.   She and her family were evacuated at 6 pm last night.  They moved in with my Mom for the night.  We were all watching the news as the fires moved down the mountain, hoping and praying for them...

Alpine Utah Fire July 3, 2012

The smoke and ash have been so bad lately we have had to turn on our windshield wipers to brush the ash
off the window so we can see!  Much love sent out to all of you who are still facing terrible fires and storms.

Julie

Wednesday, June 27

little spun cotton baby bird...

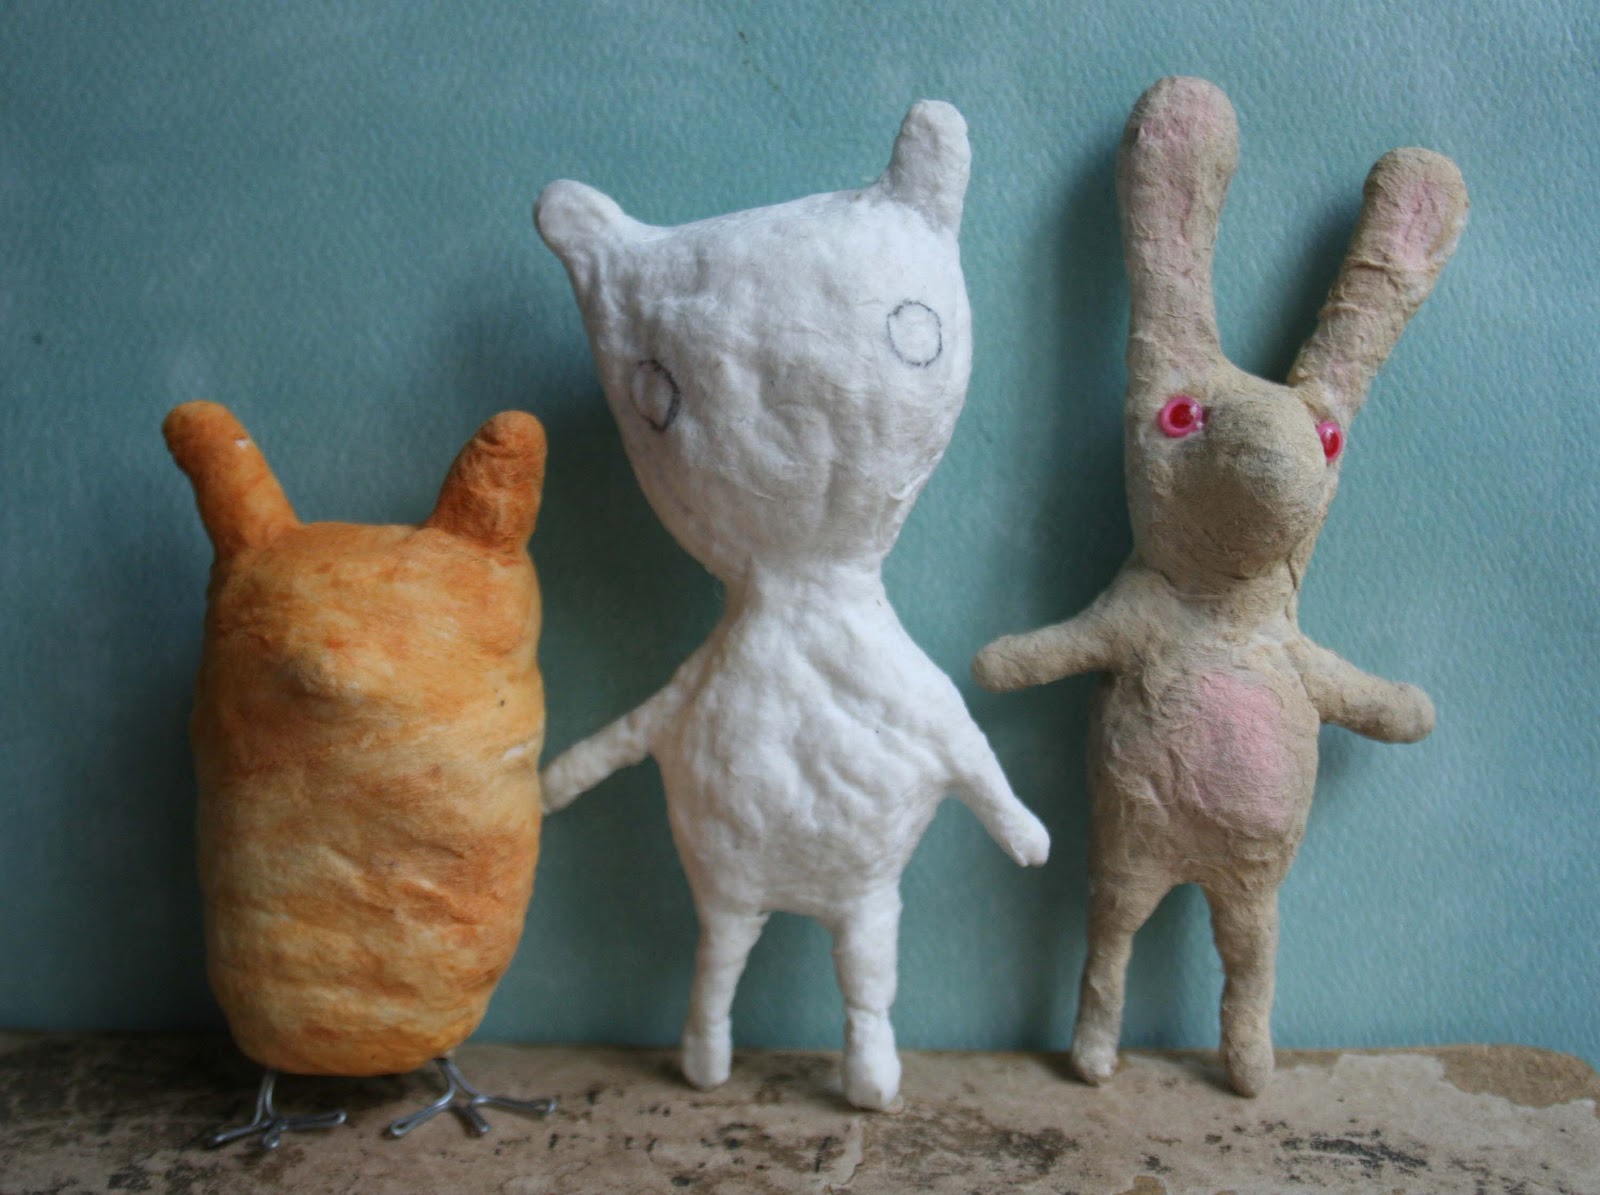
this week at my art group we are making spun cotton ornaments....
yipee, i have been dying to learn how and our friend Cheryl Burton is going to teach the class.

i have made a few attempts so far but there are so many variables~
what to use for the armature--plain wire, wrapped or coated wire, pipe cleaners
what kind of cotton to use--loose cotton, medical cotton, cotton roving, cotton balls
what to hold it together with--spray starch, liquid starch, watered down glue mixture

barn door pjs with little buttons
it will be very helpful to learn what really works!  this little guy was just made with cotton balls from Walmart if you can believe it.  he is a bit chunky but i am figuring out a few things as i go.

kitten was a bit harder to photograph as her tail sticks out weird making her so i can't lean her up against the paper.  she is made with a cotton roving and has a much smoother finish.


here are a few figures waiting for paint and decoration.  the bunny has some artificial eyes that might work out, don't know yet.  the bear needs some sort of nose, i'll have to add something on...
and the owl/wild things creature has cool feet but is pretty squishy, not enough cotton for
his figure. 

there is a 2 day drying time i think for the figures so i will be posting next week what we made at art group.

if anyone has any suggestions, ideas, or experience making spun cotton figures please email me, i would LOVE to know!

happy wednesday, julie
                                                                                                        

Thursday, June 21

the wreckage...

i'm having trouble dealing with the wreckage...

i had all my spring and easter projects all loaded up in this silver picnic tote along with my spring paints.  i never got around to painting all the pieces at easter time so they have been just sitting here and there.  it was easy to pick up and move the whole batch with the little cut out handles.

the whole thing was sitting on the end of a table that i tried to drag down the hall.  a corner of the caddy caught the wall and everything fell.  most of the little bunny and chick pots broke, even the ones i had finished.  it looked like plaster carnage all over the floor.  what a mess.


 i am not sure what the moral of this story is yet.  finish what you started, don't leave things lying around, stop trying to drag tables down the hall....

there were a few little pots left mostly undamaged that i am finishing tonight.  maybe that will make me feel better.


Related Posts Plugin for WordPress, Blogger...