Thursday, April 29

artful thursdays #16.....paper clay bird tutorial

oh bother, i had some fun things and photos to post about this week and here it is already artful thursday again. there is only a month left of school and it seems like time is flying. then there will be the long lazy summer for me to catch up....

today i will be showing how to make a paper clay bird. (the wire cage and swing i will show next week if you are interested, leave me a note) i made this little swinging bird at art group this month. we all experimented with wire forms and senta showed us how to make and paint paper clay figures. i have tried crackling mediums before but never had any success so i am thrilled to find something that actually works! i hope the photographs will let you see close-up how it turns out.

you will need:
paper clay, some wire, paints, and crackle medium. the paper clay birds are quick to make but need to dry over night before you paint them.


step #1. shape your clay figure. i used creative paperclay, an inexpensive brand that is only $7 for 8 oz. we made 12 birds using 1/4 a package. the clay dries out quickly so keep the package tightly wrapped and only take out what you are working with. smooth out any cracks and lumps with your finger dipped in water.


step #2. when you like the shape of your bird cut 4 inches of 20 gauge wire and bend it in half for the legs. (or for a hanger cut 1 1/2 inches of wire and bend in half)
insert the bend end into your clay bird for the legs. i left the wires long so i could have some length to wrap them around the wire swing and trim later. shape the clay around the wire and smooth with a rubber tipped clay tool or a smooth paint brush end.
step #3. stand up your bird in a piece of modeling clay and let dry overnight.


step #4. sand your bird with a fine sandpaper or fingernail file and wipe off sanding dust. sketch your design with a sharp pencil.


step #5. using a fine paintbrush and acrylic paints paint your design on your bird. let dry completely. here is lily on my desk for painting inspiration, even though she is a chicken....
step #6. squeeze out a bit of one step crackle. it is milky white like diamond glaze if you have worked with that product. paint on the crackle medium in an even coat over your bird and let dry. a thin coat makes a smaller crackle. you can see the cracks start to appear as you watch, cool!


step #7. after the crackle glaze is completely dry squeeze out a bit of brown acrylic paint. add some water to thin and paint it over the crackle glaze. wipe off the excess with a damp cloth if you get too much color.

your darling bird is done! isn't the crackle glaze so easy, i am excited to try it out on a painted canvas to see how it works.

here is why i have wanted so much to learn how to make little things with paper clay, i bought this little elephant in a hot air balloon and the tiny squirrel from my friend senta plyer at the winterfrost sale last december. i absolutely adored everything she made and wished i could have purchased it all! these two pieces were my favorites.


happy thursday, julie

Thursday, April 22

artful thursdays #15.....party kitty paper doll tutorial


today we are exchanging paper dolls at my art group. i finally got an idea last night of what i wanted to do. i was looking through my 2008 day book at some sketches and paintings i did and found this little kitty...


i like how the little painting turned out on ledger paper so i used the same idea for my paper doll.
gather together a few supplies: nice, smooth paper that you can water color on, pencil, eraser, permanent pen, watercolors, brushes, goache, scissors, tracing paper.


step #1. sketch out a figure in pencil. draw over the lines with a permanent pen. when the ink is dry erase any pencil marks.


step #2. paint your figure using acrylic, watercolor, or guache paint. let dry.


step #3. lay a piece of tracing paper over your figure and sketch out little clothes and hats to fit. i draw simple outlines and decorate later.


step #4. turn the tracing paper over and lay it down on your decorative paper or painting paper. trace over your pencil lines. this will 'transfer' your design onto another paper.
step #5. for the little pink dress i inked the lines with a permanent pen, then erased the pencil lines.


step #6. cut out the dress and decorate with little trims and glitter. the little green and blue party outfit was painted with water color and has a crepe paper sash and a flower cut from a silk petals. i also made a little cake and a mouse balloon for party kitty to play with.


step #7. when all your pieces are cut out and decorated, glue them down to a paper base and color copy.


here are a few of my favorite paper doll artists:

alice in wonderland and the queen of hearts by marina.


these darling halloween costumes by danita.


perhaps you will make a paper doll of your own, or start your own collection of tiny dolls. enjoy, julie

Thursday, April 15

artful thursdays #14.....zipper purse tutorial

ok, huge confession here...i have the biggest wool collection in my state, i think.
plus i never, ever pass up a vintage metal zipper at a sale. i buy even the used ones that someone clipped out of a skirt. it seems i always see a vision of something new that could be made with old vintage wool skirts and coats. time to get busy making some zipper purses for my artful thursday project this week...
my favorite thing to tuck inside these little purses is my jewelry when i travel, next i like to corral all the little things that collect at the bottom of my purse: lipstick, gum, nail file, that sort of thing. once you make one you will be making them for everything. 4 seams on the sewing machine and a bit of hand stitching is all it takes.


gather together scraps and pieces of wool felt. i use washed and felted clothing and hand dyed wool. even the tiniest pieces will make a flower.
you will also need a zipper, any length will do, i always cut off the extra, some embroidery thread and something sweet to sew on top like a vintage button or bead.


step 1. cut your wool felt into a rectangle. my tiny size purse is 8 inches by 5.5 inches.


step 2. scallop or zig zag cut the short ends of the wool rectangle.


step 3. pin the cut edges to your zipper and sew both ends to your zipper. i use my zipper foot and a smaller stitch like 2.5.


step 4. close the zipper and turn the purse inside out. pin the two ends closed. you can either center the zipper down the middle, or move it to one side a bit. sew the zipper pull end first. unzip the zipper just a bit and sew a 1/4 seam allowance. i sew this seam twice to make it extra sturdy.
step 5. now sew the other end closed. it is a bit tricky sewing over the metal zipper teeth. i have a sturdy jeans needle i use and i 'walk' the needle over the zipper teeth with my hand. sew this seam twice also.


step 6. cut the zipper end off with utility scissors and turn the purse right side out. poke all four corners out nicely and press your zipper purse using a wool setting on your iron and steam. i iron right over the zipper.


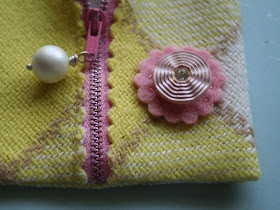
step 7. now for the the decorating part. for this little purse i added a felt flower embellishment and stitched it on with embroidery thread.


my friend cassondra walters mailed me these gorgeous vintage wool flowers. you can make your own with tiny scraps of felt.


first i cut out the two felt circles using a circle template and trace the circles with a pencil. cut out the green felt stem and leaves and place them on the purse where you like them. sew through the two circles and attach the little applique and bead.


step 8. using a pale green thread sew tiny back stitches to attach the stem and leaves. so adorable! these little purses feel so thick and scrunchy in your hands and can totally go the distance with their metal zippers.


here are a whole stack of ideas to get you going.


these two purses have millinery flowers sewn on them.


i couldn't resist this polka dot fabric to line this purse, plaids are my favorite!


fancy buttons make great flowers!


these two purses have tiny seed beads and embroidery for the design.


if you like you can attach a fun bead or button to the zipper pull with a jump ring. this little bell shaped glass bead looked like a little mushroom to me.
happy thursday, julie

Tuesday, April 6

baby buggy spring wishes....


i went on a little spring holiday with my family last week so i didn't post an artful thursday project. it was such a great break, lots of hiking in the red rocks and swimming at the pool. we came home with red sand everywhere and a few new freckles.
i'll see you this week for a new artful thursday project.

happy baby buggy spring wishes, julie

Thursday, April 1

artful thursdays #13....vintage wrist corsage tutorial


easter just seems like the perfect time to wear a flowery bonnet or corsage. my artful thursday project for today is a little velvet wrist corsage bursting with blossoms. i gathered together a few vintage finds: a vintage linen with crocheted edges, flowers and leaves from a squashed dolls hat, velvet ribbon, and some buttons.


step #1. cut 10 inches of velvet ribbon. mine is almost an inch wide.


step #2. fold one end of the velvet under 1 inch and hand stitch in place. sew a button on the right side of the velvet. this little crocheted button is 1/2 inch wide.


step #3. wrap the ribbon around your wrist and have someone pin the velvet band to fit comfortably. notch cut the ribbon end.


step #4 i haven't sewn a real button hole in years so my button hole is a shortcut. (you can even use some vintage snaps or a hook and eye closure if you don't have a sewing machine) mark where the button hole should go. I placed the button on the ribbon and marked with a pencil a dot on either side of the button. then i drew with pencil the rectangle lines to sew for the button hole.
step #5 sew around your pencil lines with a small (size 2) straight stitch on your machine. cut inside the stitching with a button hole cutter.


step #6. button your velvet band on your wrist to mark where you want your flowers. i like my crocheted button so well i want it to show. you may want to have the button be on the inside of your wrist.


step #7. cut a strip one inch wide and 12 inches long from a vintage hanky or other linen that has a pretty hand crocheted edge. this arm rest piece was very stained and worn thin so it was only 50cents.
step #8. sew a straight stitch with a needle and thread along the edge and gather the strip into a flower.


step #9. sew the gathered flower to your velvet band.


step #10 start layering on your little flowers, leaves, and ribbons one at a time and sew them in place.


the little wristlet when it is done feels so soft on your wrist, it would be so lovely to wear to a dance and then keep in your jewelry box.
happy thursday, julie