Monday, December 14

winter frost holiday art market


this past weekend my art girlfriends and i got together for our first ever holiday art market. the snow outside added the perfect frosting to our winter creations. this poster was designed by our own senta plyer so fun to hang up around town. gals traveled from near and far bringing their handmade jewelry, hats, paintings, dolls, tiny paper mache figures, toffee, purses, and vintage decorations aplenty. it was magical.
of course, i was an excellent shopper. it is such a treat to buy something handmade especially when you know the artist.


my favorite thing from the things i made were these vintage wool wreaths made with all vintage supplies gathered from old christmas corsages, millinery hats, and christmas decoration boxes. i can't resist the desire to save an old vintage wool sweater or coat and give it a new life.


i sold some of my glass garland beads and my tiny bottle brush tree boxes. some glittery winter cones and stars, and these fun candy striped ornaments made with my ruffled crepe paper.


my two daughters both brought paintings, paper dolls, and little kitty ornaments to sell. a few of them are in my shop until they are gone. wishing you all the merriest of holidays, julie

hey look, lola ended up on the creative jar!


Friday, November 13

easy crepe paper rosette tutorial...


today i figured out a really easy way to make crepe paper rosettes to decorate little holiday packages. forget about gathering the edge of your crepe paper with a needle and thread! i was decorating the front of some tiny boxes and wanted a crepe paper rosette about one inch wide. here is what i did:

step 1.
cut a piece of ruffled crepe paper garland 2 1/2 inches long. (instructions for a flat piece of ungathered crepe paper is at the end of the post) and piece of thin craft wire 4 inches long.


step 2.
gather up the center of the crepe paper ruffle along the stitching and fold the wire over the middle of your bow tie. twist the wire a couple times in the back until it is snug and trim the wire ends. fold the sharp ends over flat.


step 3.
spread out the ruffles evenly around to unfold the rosette into a full circle. it worked out that the one inch wide piece of crepe paper made a one inch rosette...
simple huh.
i left the sides a bit open at 9 o'clock and 3 o'clock for you to see how it unfolded and if you look closely you can see the wire band around the center.


step 4.
to finish decorating the rosette i used aleenes tacky glue to attach two velvet leaves on the front of my little paper box, then added three tiny stamen buds on each side and glued the crepe paper rosette in the middle. i added a nice round glue blob to the center of the rosette and sprinkled coarse silver glass glitter over the glue and shook of the extra. let the glitter dry with the rosette right side up.


such a sweet little box to package my holiday selection of vintage glass garland beads. brand new in the shop today. happy weekend, julie


here are the instructions for starting with a flat piece of crepe paper.

to get a piece of crepe paper one inch wide i either trim off a one inch strip from the flat fold crepe paper all in one go without unfolding it. you can use a rotary cutter and a ruler for this or just eyeball it and use some sharp shears.
or if you are using the 2 inch wide streamer rolls, unroll a length and cut the strip in half. for a one inch rosette like the one i made above here is the first step.

step 1.
cut a piece of crepe paper one inch by 10 inches. lay it on your work surface straight out from you. gather the center with your fingers pinching the crepe paper as you move up the strip. when you have your bow tie shape continue with step 2 of the instructions above. have fun. j.

Tuesday, November 3

vintage holiday art kits


i have been shopping all year for wonderful old vintage holiday treasures. each time i would find a glass garland, some flocked jingle bells, or strings of tinsel i tucked them in boxes waiting for today....

last night i got out my boxes and spread their contents all over the carpet as i unpacked each lovely, sparkling thing. i started organizing the pretty bits by color and put together my first three vintage holiday art kits.

if classic red and green is what you adore this tiny velvet stocking would be perfect on your tree.


if whisper pink sets your heart all aflutter then this collection is for you. glass balls and garland, crepe paper ruffles, and the tiniest silver tinsel string wrapped around a vintage playing card.


or open the vintage flocked ribbon bag and find inside these beautiful old gold garlands, german paper stars, and metal tinsel.


i just couldn't wait to share them with you. happy tuesday wishes, julie

Monday, October 5

little art kit.....


i have always adored sending out little packages. this little art kit went to one of my favorite students headed back to school. i tucked in a few of my favorite tiny art treats to keep her busy (when she is not studying....)


i can never resist the feel of a new journal. the paper is smooth and clean, the binding fresh. this darling hand bound journal came from huishbooks on etsy. i love the tiny grommets and the waxed linen thread.

these little pop a point pencils are my silly fixation. i used them as a little girl, marveling at each new sharp point when i tucked the old one in the end.


vintage dennison office supplies are another one of my weaknesses. i would love to travel back in time to a five and dime store just to see their display of gummed labels, holiday paper decorations, sealing wax, and crepe paper. whenever i find a whole drawer full of this old stuff dumped into a box at an estate sale i swoon.


sweet little ruffles are at the top of my favorites list. i have been making piles of these vintage crepe paper ruffles in every color. trying to figure out how i can make some gold and silver ones for the holidays.


all nestled together and tied up with ribbons and strings it makes going back to school decidedly fun. your back to school student will surely thank you...
(scalloped oval punched from a vintage whitman playing card)

Tuesday, September 1

healing...


i began this summer biking up my canyon every morning uphill into a stiff headwind. i would curse the wind and wonder everyday if i could make it to the top of the trail.
each day i would return. each day the wind was always blowing.

i have had so many lovely notes wondering how things are going, why my last blog post was the first of may. thank you for your thoughts and genuine kindness.
without knowing why i knew i needed to take some time to heal myself, to find a peace and stillness that was missing in my life, and to make a place for something new.

some days i would click on my blog and stare at my last post and wonder if i would find a place for it again, if i would feel the connection and desire to share again my journey. then i would walk away from the computer feeling sad and confused.

the floor of my studio piled up with things, dust gathered around and wispy cobwebs attached themselves to my glass glitter bottles in my window sill. i became afraid that maybe this part of my life was over, that i had let it dry up.

i didn't even really know why i was drifting...


i watched the flowers bloom alongside the canyon trail, the sun rise each morning, the colors change as the grasses dried in the heat, and watched the path of the sun as it traveled across the sky.

i learned to be still.

i feel like now a few months later i understand a bit more why i followed that voice inside that said make a little space.

i had to learn again how to lay in the fresh summer grass gazing up at the leaves fluttering in the wind, losing myself in the beauty of the trees. there have been too many voices in my head. i had to be still until they all went away.

i had to learn again how to look and see the people around me. not as they are when they are simply passing by with their voices trailing behind them but as they appear before my eyes, glowing with life and dreams, and sometimes aching and broken.

i had to learn again how to care for myself so i had something to give. i needed to heal my own aching heart so i could feel brave enough to share it.


today i headed up the canyon for an early ride. the wind was blowing. i felt it gust against my bike and blow across my face. as i came to the first long climb i realized i was smiling as i cranked the pedals. i called out loud to the wind 'do your worst' and then pedaled on to the top.


these are a few photos of the book 'Living Praise' i created after my husband's father died just before Christmas. it was published in the first issue of Art Quilting Studio this summer. it is one of my favorite pieces of work and i am so happy i had the opportunity to share it.


the folded linen pages were sewn to a wool felt backing that i glued to the inside of the book.


self adhesive book binding tape being applied to strengthen the spine.


spreading tacky glue to the book binding tape just before pressing in the wool felt backing.

(photos 4 and 5 are from Art Quilting Studio)

the song 'little pieces' by gomez

Friday, May 1

felt bon bon ring tutorial


yesterday i went up to salt lake to the ABC channel 4 studios and filmed a live segment for the Good Things Utah show. first time ever on tv and let me tell you it was totally cool! (but it still stressed me out...)
i went into the green room to wait until it was time for me to set up. there on the wall was the 10 foot poster with the Lost cast. i set up a table with beautiful wool beads and little dishes of supplies with all the steps ready to show the felt bead rings from my book. i had only just got a mike on and stepped behind the table when the camera man said '10 seconds and you're live' i thought ok, here it goes.

i decided to post a tutorial here so you can make one of the felt bon bon rings from the show for yourself.

i love working with wool felt. it seems i always have a stack of felt scraps stacked on my desk next to a pretty tin filled with wool beads. i guess it isn't much of a surprise then that one day while playing around i made one of these bon bon rings. my first one looked so much like a little jello mold i had to laugh.


it was so satisfying to cut apart the wool balls i started adding felt, beads, ric rac, trim and vintage millinery flowers to my collection of little candy rings and they all ended up in my book pretty little felts.
the first step is to cut the wool bead in half with a pair of sharp scissors. i love the colors and selection of wool beads from Ornamentea. the ones i have used here are the 2 cm size.


lay your circle template over the wool bead to choose the size then trace the circle onto the back of a piece of felt with a pencil or a water soluable marker. (mark be gone is a good one)


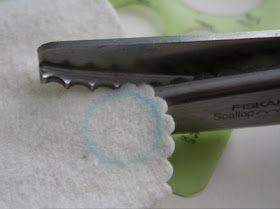
cut around the circle with a pair of scalloped or zig zag scissors lining up the points with the edge of the circle. glue the half bead on the right side of the scallop circle using tacky glue and let dry.


gather together some ric rac, tiny beads, sequins, embroidery floss, and any other pretty embellishments you would like to use and sew or glue them onto your wool bead.
after decorating you felt bon bon use E600 to adhere the felt to a ring blank and let it dry.


here are some variations i have made. those fancy sew on gems were on an old hat i bought.


here is my little bon bon ring ready to be mailed to a friend tucked in tiny paper mache box and surrounded by a nest of crepe paper.

with a couple of flowers tied to the top it makes a lovely gift. enjoy, julie